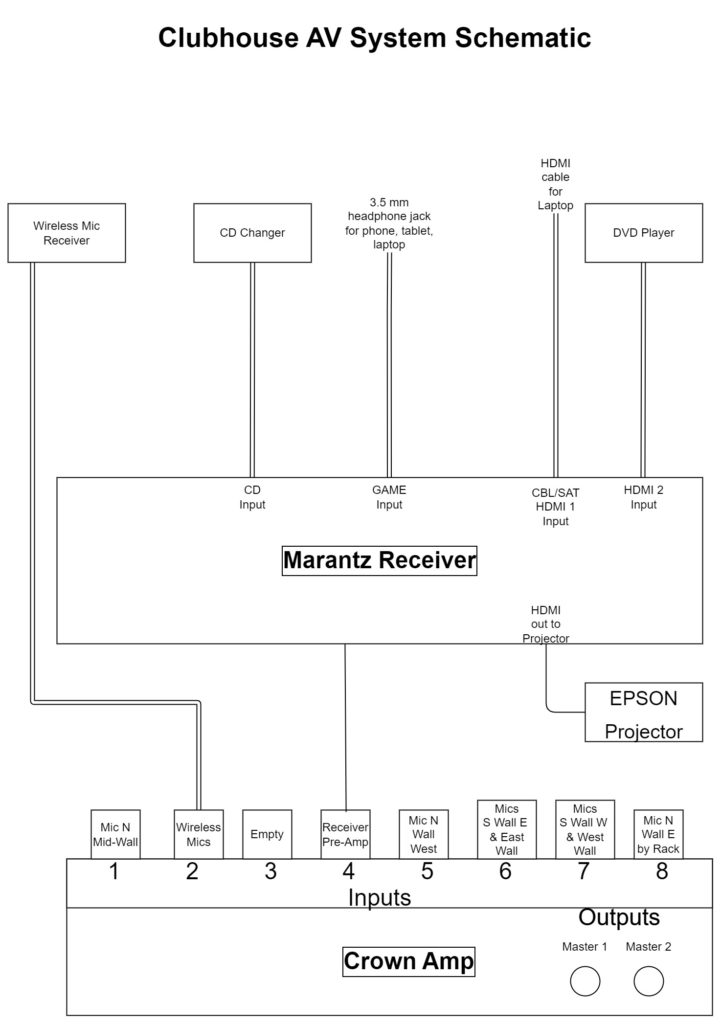
Westacres Club house Audio/Video System
Directions
- Open front door of cabinet (it might seem locked but it’s not)
- Turn on power to the Crown amplifier and the Marantz receiver
- Nothing more needs to be changed on the Crown Amp
- Select the desired audio/video input source on the Marantz receiver using the knob on the left. See descriptions below for guidance.
- Streaming music from a phone, tablet or laptop
- Set the receiver input to “Game“
- Use the white cable on top of the cabinet. It has a 3.5mm headphone jack connector
- If you need an adapter for a USB-C or Lightning port on your phone, they’re in the silver drawer below the receiver. Please remember to return them to the drawer when you’re done.
- Wired Mics plugged into wall jacks go direct to amp, no need to set any inputs
- Wireless microphones
- Wireless mics go direct to the amplifier, no need to select an input on the Marantz receiver.
- Turn on the TONOR mic receiver by pressing and holding the button on the left (mic receiver is located on top of CD player).
- Mics are in the silver drawer, press and hold the gray button to turn them on. They will automatically pair with the receiver
- IMPORTANT: put your mouth CLOSE to the end of the microphone! They are made to pick up sound that is CLOSE to the mic. Lips almost touching the TOP of the mic is the correct distance.
- Laptop video/audio
- Set input to CBL/SAT
- Connect the HDMI cable to the laptop (black cable on top of cabinet toward back)
- Turn on EPSON overhead video projector using the remote. Aim the remote at the projector and press the Power button. When done, turn power off by pressing the Stand By button on the remote.
- DVD Player
- Set input to DVD
- CD changer
- Change receiver input to CD Changer
Microphone wall plate locations
Amp Inputs
1 – North Wall Middle
2 – CD Changer
3 – Empty
4 – Receiver Pre-Amp Input
5 – North Wall West side (broken wire and connector release)
6 – South and Southeast Walls
7 – South and Southwest Walls
8 – North Wall East (by rack)

